3. The ASP.NET Account
Some of the subtlest
issues with ASP.NET deployment involve security. When the web server
runs your web application, it performs all its work under a specific
Windows user account that has a carefully limited set of privileges.
The actual account that's used depends on the web server you're using:
If you're
using the integrated test server in Visual Studio, the server runs
under your account. That means it has all your permissions, and as a
result, you generally won't run into permission problems while you're
testing your application. This can be very misleading, because you
might not realize that there are potential permission problems waiting
for you once you deploy the application.
If you're using IIS 7, it's the network service
account. This is a special account that Windows creates when you first
install it. It's not allowed to do much, but it can access network
locations.
If
you're using IIS 7.5, it's an account that's based on the application
pool. For example, an application pool named ASP.NET v4.0 will use an
account named IIS AppPool\ASP.NET v4.0, which IIS generates automatically.
NOTE
The network service and
the application pool identify have the same privileges and
restrictions. However, by adding the application pool identity feature,
IIS 7.5 makes it easier to set up web servers that host several web
applications. If all these web applications were to use the network
service, they'd get exactly the same permissions—which means an added
permission that's given to one application will become available to all
other web applications, even though it might not be appropriate for
them. Although this problem can be avoided by explicitly creating
separate application domains that use different accounts, the
application pool identity feature does the job automatically.
New ASP.NET programmers
often ask why ASP.NET code doesn't run under another account—say, the
account of the user who is making the request from the browser.
However, if you consider this situation, you'll quickly realize the
problems. It's almost certain that the end user doesn't have a Windows
account defined on the web server. Even if the user has a corresponding
user account, that account shouldn't have the same rights as the
ASP.NET engine.
The trick is to use an account
that's limited enough that it can't be abused by attackers but still
has the required permissions to run your code. Both the application
pool account and the network account achieve that goal, because they
have a set of carefully limited privileges.
By default, the ASPNET
account won't be allowed to perform tasks such as reading the Windows
registry, retrieving information from a database, or writing to most
locations on the local hard drive. On the other hand, it will have the
permissions that are essential for normal functioning. For example, the
ASPNET account is
allowed to access the c:\Windows\Microsoft.NET\Framework64\
v4.0.30319\Temporary ASP.NET Files directory so it can compile and
cache web pages.
The limited security
settings of the ASPNET and network service accounts are designed to
prevent attacks on your web server. In most cases, the goal is to
prevent any attacks that could exploit flaws in your application and
trick it into undertaking actions that it's technically allowed to do
(such as deleting a file) but should never perform. Although this is a
worthwhile goal, you'll probably find that your applications require
some additional permissions beyond those given to the ASPNET and
network service accounts. For example, you might need access to a
specific file or a database. To make this possible, you grant
additional permissions to these accounts in the same way you would
grant them to any other Windows user account. However, the process
isn't always obvious—so you might want to consult a good handbook about
Windows system administration before you take these steps.
Alternatively, you might
want to change the account that's used to run the worker process to a
different account with the required permissions. The following sections
explain how.
NOTE
Before changing the
account used to run ASP.NET code, make sure you fully understand the
effects. If you use an account with more permissions than you need, you
open the door to a wide range of potential hacks and attacks. It's
always best to use a dedicated account for running ASP.NET code and to
restrict what it can do to the bare minimum.
3.1. Changing the ASP.NET Account
The Windows account is one of
the advanced settings that's associated with an application pool. To
change it, select the appropriate application pool, and click Advanced
Settings in the Actions pane on the right. The setting you need to
change is Identity (Figure 5).
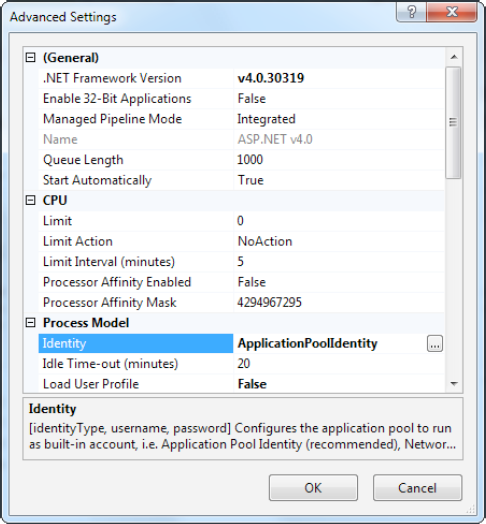
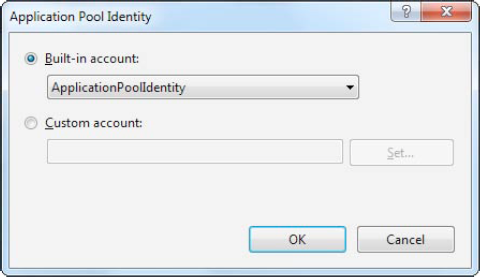
To change the Identity
setting, select it, and then click the ellipsis (...) button on the
right side of the property box. The Application Pool Identity window
will appear (Figure 6. It gives you two choices:
Use a built-in account:
Choose one of the predefined
account types from the "Built-in account" list, including
ApplicationPoolIdentity (in IIS 7.5 only), Network Service (the
low-privileged account used by default in IIS 7), Local Service (which
is similar to network service, but without the ability to access
network locations), or Local System (which runs as an administrator
with extensive privileges).
Use a custom account:
Choose "Custom account,"
click Set, and then supply a user name and password for a specific
account. If you take this approach, the information you enter is
encrypted on the web server, so it can't be dug up by crafty hackers.
When you make your change in
this way, you affect all the web applications that use the application
pool. Another option is to create a new application pool first, using
the Add Application Pool command from the Actions pane. You can then
configure this application pool to use a specific user account.
3.2. Giving the ASP.NET Account More Privileges
Changing the account that
ASP.NET uses is a risky step. If you're not careful, you'll end up
using an account that has more permissions than it should. It then
becomes easier for a malicious user to perform an attack that damages
your web server or its data.
For example, imagine you
create a web page that allows users to upload files. If you don't
design this page carefully, the user might be able to trick your
application into uploading a file into a location it shouldn't, such as
the c:\Windows directory. If your web application is running with
elevated permissions, it might be allowed to overwrite a Windows system
file in this directory—which allows the attacker to cause much more
damage with this exploit.
For this reason,
security experts recommend giving your web applications the smallest
set of permissions that still allows them to function properly. One of
the easiest ways to implement this design is to start with a strictly
limited account (such as the network service account or the application
pool identity) and then gradually give it the additional permissions it
needs (but nothing more). There's no magic to this approach, but you
might need the help of an experienced Windows administrator to figure
out how to set permissions for various Windows resources.
|
It's often better
to assign permissions to a group, not a specific user. This makes some
administrative tasks easier, and it makes your entire setup more
flexible. No matter what version of IIS you're using, you can use the
IIS_IUSRS group. In IIS 7, the network service is a member of this
group. In IIS 7.5, all the application pool identities are members of
this group.
|
|
3.4. Configuring a Website
The application pool allows you
to modify a small number of low-level settings. But the vast majority
of tweakable options are set directly on your website. To see these,
select the web application in the IIS Manager tree, and look at the
array of icons that appears in the Feature view on the right (Figure 7).
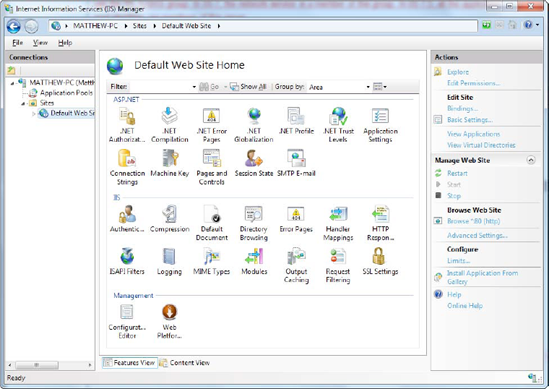
The website configuration
settings are split into three broad groups, which are arranged
alphabetically: ASP.NET, IIS, and Management.